Recording
Report the most effective vocals at residence: recording and mixing for freshmen

You’ve been sinigng within the bathe for so long as you possibly can keep in mind and now you’re able to report your singing at residence.
So that you need to know report studio high quality vocals at residence, proper? No drawback, you’re in the appropriate place.
We’re going to share with you put together and the place to recod your vocals at residence, what it is advisable report skilled audio, place your microphone and quite a lot of recording strategies, in addition to combine your vocals right into a tune!
So let’s start this journey so you can begin recording nice vocals at residence!
Preparation suggestions for recording vocals at residence
Step one to recording the most effective vocals at house is preparation.
Firstly, you’ll need to ensure you’ve bought all lyrics memorized and the way they match with any melodies in your observe.
Secondly, preserve your self hydrated. As you need to preserve your vocal cords versatile, you’ll need to drink loads of water. Moreover, preserve your self away from dairy merchandise like milk and chocolate, in addition to any chewy, thick edibles like toffy.
And don’t smoke any cigarettes earlier than or in the course of the recording session Tobacco will injury your vocal cords over time anyway, so you need to keep away from smoking earlier than the session.
Thirdly, do some vocal warm-ups!
Lastly, ensure you’ve bought a pair of closed-back monitor headphones handy. Headphones that you realize and belief are essential instruments for monitoring recordings, particularly in unhealthy acoustic areas.
The place to report your vocals at residence
The atmosphere you report in is a HUGE factor to think about, so it’s essential to find out the most effective place to report vocals at residence.
In apply, poor acoustic areas will ship a whole lot of replicate sound into your microphone and have an effect on the standard of your recording. Subsequently, report someplace with the least mirrored sound as a result of a recording atmosphere with poor acoustics will make it tough to seize an expert recording.
Apart from that, rooms with a whole lot of reverb aren’t so good for all musical kinds both. For instance, artists singing rock, hip-hop, pop, and even EDM vocals are inclined to need rooms with a “lifeless” sound the place no pure reverb happens.
In distinction, vocalists with extra classical tastes experience rooms ample with reverb. Giant rooms with wood flooring are rooms the place reverb thrives, so if you wish to experiment with these circumstances then search for an area to rent.
However if you wish to report in a lifeless house you then’ll need to discover a handled room or construct your individual vocal sales space. Higher but, in case you can deal with your individual room then you’ve gotten much more choices!
However in case you can not deal with your individual room then your wardrobe full of sound-absorbing garments is your greatest wager.
Alternatively, creating an enormous pillow fort with a thick quilt is one other reasonably priced choice. Like clothes, duvets present some sound absorption and can dampen the sound of your vocals.
Nevertheless, some vocalists could not sing at their greatest in the event that they’re remoted away from everybody else on the observe. So it’s essential to make your self comfy as you possibly can.
Every thing it is advisable report vocals at residence
First off, you want a microphone. I wager you didn’t see that coming…
The kinds of microphones
Although there are three kinds of mics, we’re solely going to speak about condenser and dynamic microphones as a result of ribbon microphones are an costly choice. Let’s examine the differnt kinds of mics and see which is greatest for recording vocals.
Dynamic microphones
A dynamic mic is a sort of microphone able to capturing loud sound sources.
These microphones have a diaphragm that oscillates forwards and backwards in relation to the power of the incoming sound wave. Then a coil that’s hooked up to the diaphragm oscillates – with the diaphragm – over a magnet.
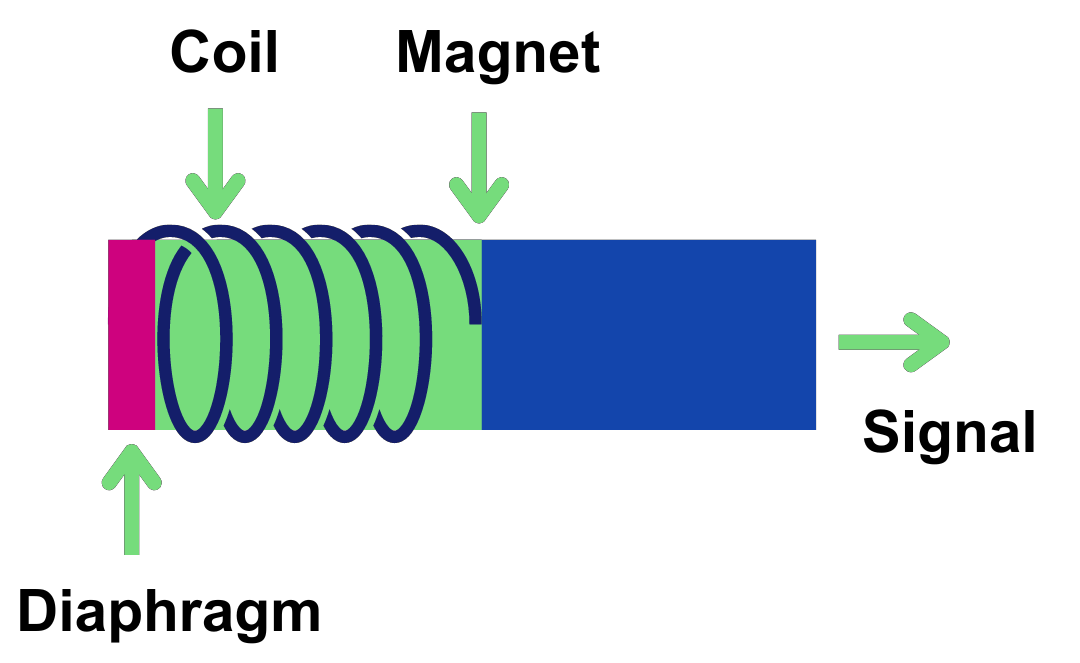
In consequence, the oscillation generates {an electrical} present relative to the power of the sound.
Dynamic microphones reply properly to fluctuations in frequency and transient info, they usually can deal with excessive sound stress ranges (SPLS) properly which makes them nice for recording loud sound sources and performing stay.
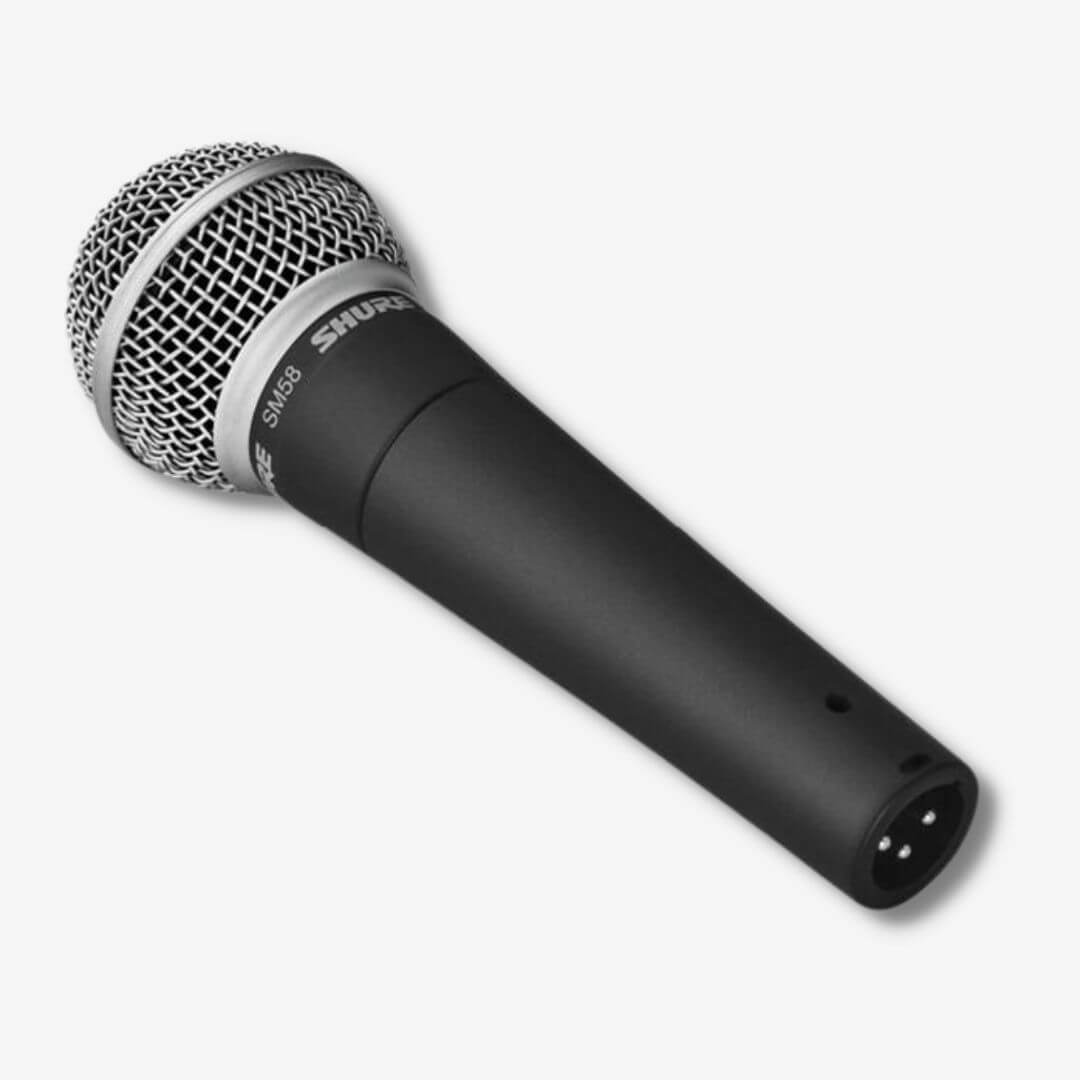
The Shure SM58 is the most well-liked dynamic microphone there’s. Actually, vocalists apply it to stage and even within the studio because of its tailor-made frequency response.
Condenser microphones
There are two kinds of condenser microphones: massive diaphragm and small diaphragm. However small-diaphragm microphones are much less suited to recording vocals in comparison with large-diagram mics so we’re not discussing these right here.
Like dynamic microphones, incoming sound waves vibrate a diaphragm. However quite than being hooked up to a coil, the diaphragm is hooked up to a metallic plate referred to as the backplate.
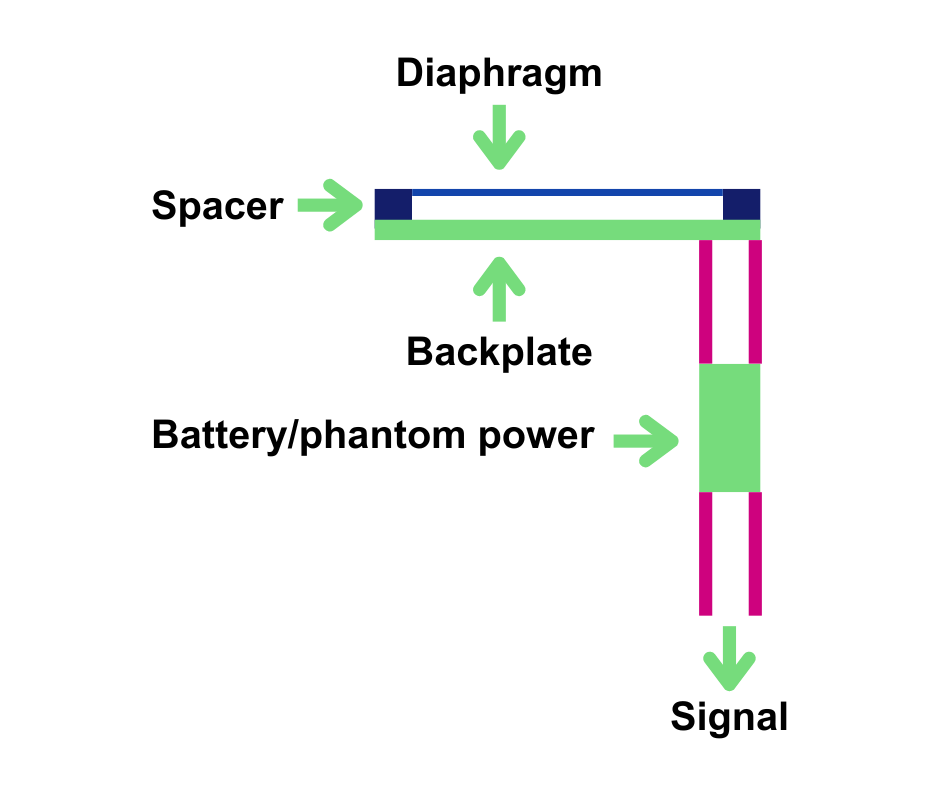
Then, the space between the diaphragm and the backplate adjustments because the diaphragm vibrates. And this course of creates {an electrical} present relative to the incoming sound wave.
Nevertheless, {the electrical} present {that a} condenser microphone can generate is weaker than that of a dynamic mic. Subsequently you’ll have to amplify it earlier than you are able to do something with it.
The design of condenser microphones and their dependence on exterior energy makes them extremely delicate microphones. Whereas dynamic microphones can deal with loud sound sources, condenser microphones are good at dealing with quiet sources or these with intricate sonic particulars.
Actually. they will register the extra intricate particulars of an acoustic instrument or the human voice that almost all of dynamic microphones can’t.
Giant-diaphragm condenser microphones
Giant-diaphragm condenser microphones are the most typical microphone for skilled vocal recordings.
These microphones can seize a wide selection of frequencies – from the underside to the highest finish – and supply a fuller sound. That’s why they’re usually the go-to alternative for recording vocals.
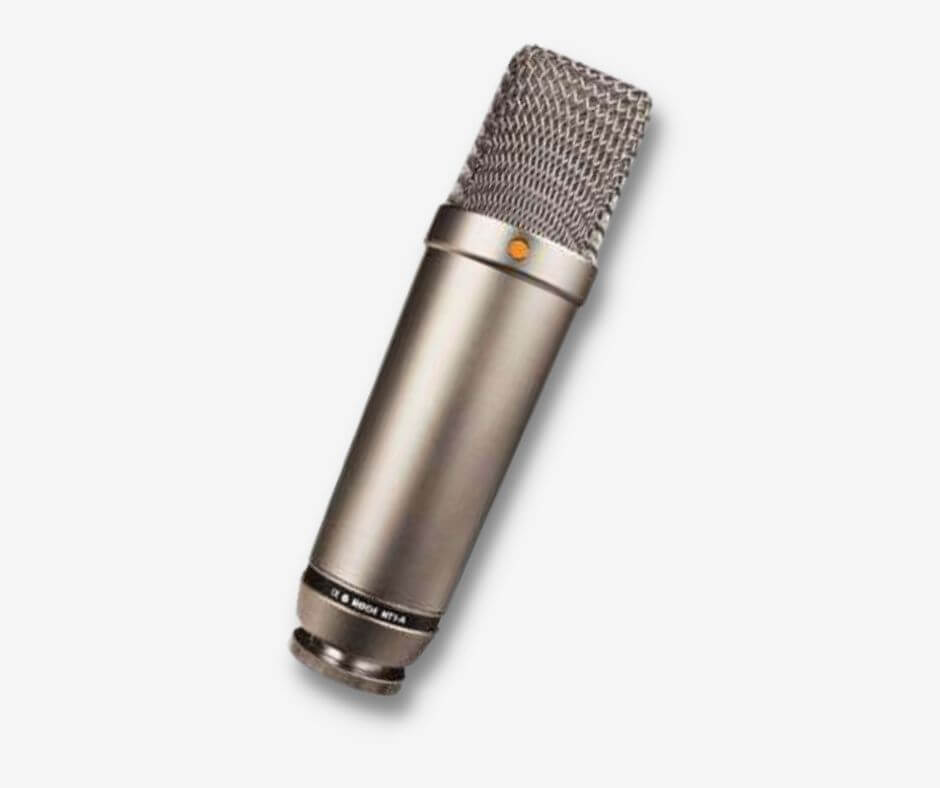
Furthermore, massive diaphragm microphones have much less self-noise which lets you preserve your recording clear too.
Phantom energy
However, as we stated, condenser microphones require exterior energy. And it’s phantom energy that provides that enhance in present.
Condenser microphones have a whole lot of electrical resistance (impedance) in order that they want a powered circuit to scale back that resistance. Phantom energy reduces the resistance and provides condenser microphones the facility to output a louder sign.
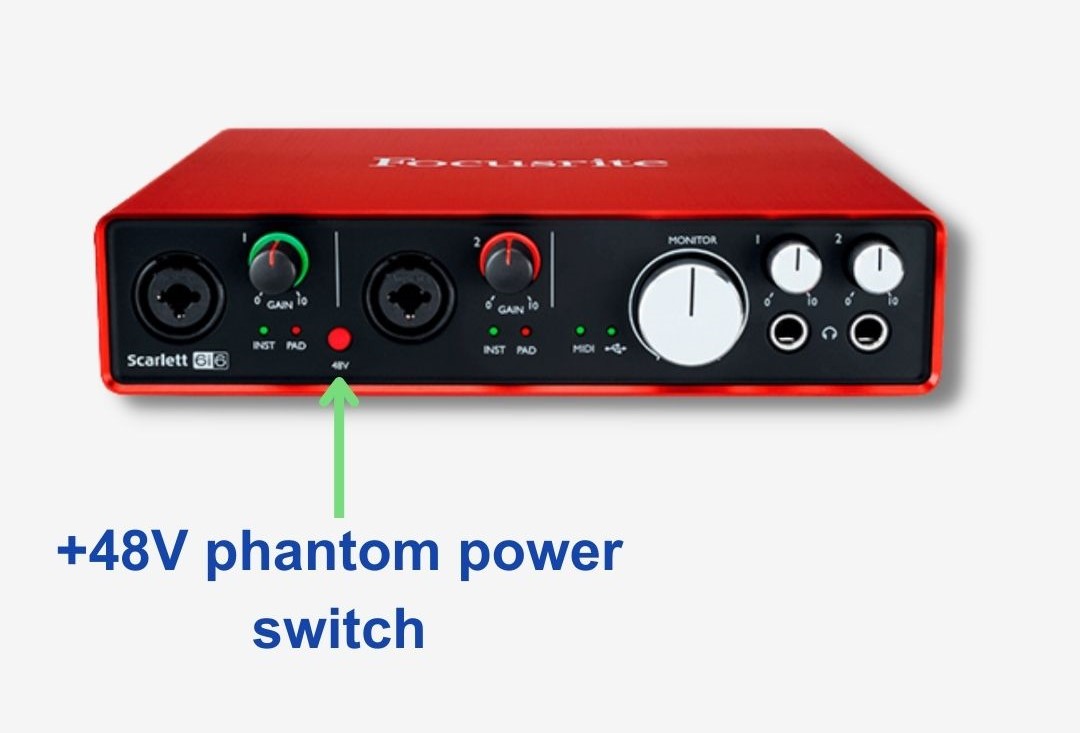
Fortunately, audio interfaces provide phantom energy for condenser microphones, so you possibly can report with condenser mics at residence.
What else do it is advisable report skilled vocals?
There are a handful of different instruments you’ll want apart from the appropriate microphone.
1. Pop filters
A pop filter acts as a barrier between your mouth and the microphone diaphragm and filters out the pop sounds (plosives) that happen with letters like Bs and Ps.
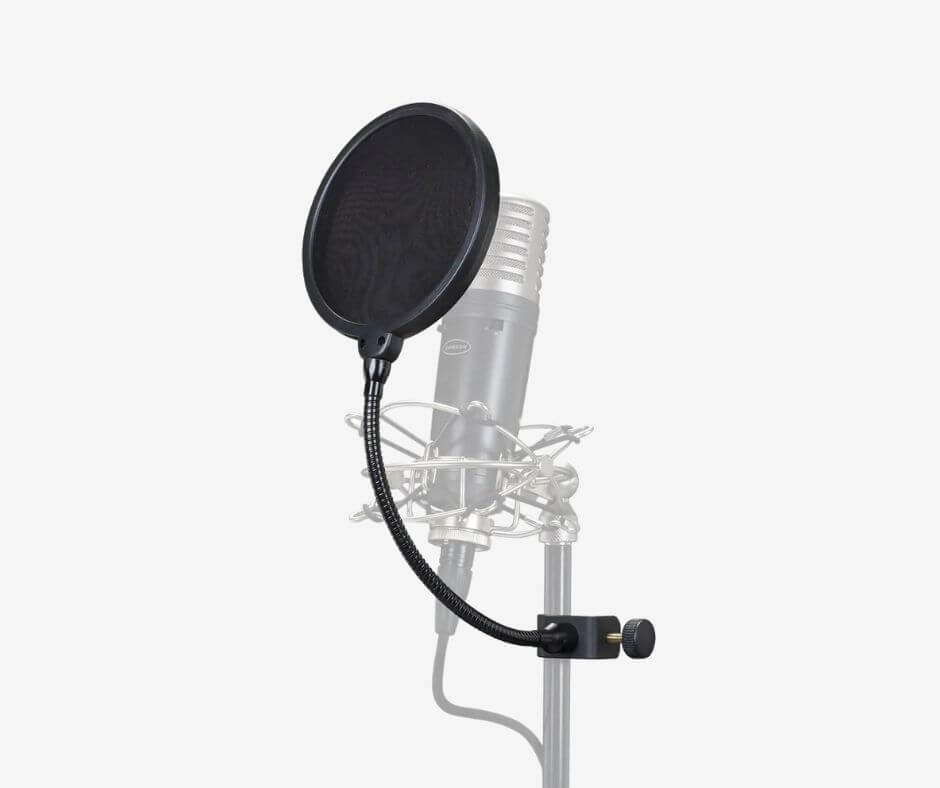
In consequence, pop filters lower the impression of plosive sounds that your microphone captures.
2. Microphone stands
Microphone stands are mounts for microphones, and there are six differing types. They will let you place your microphone freely, with the speedy profit that you just don’t have to carry your microphone.
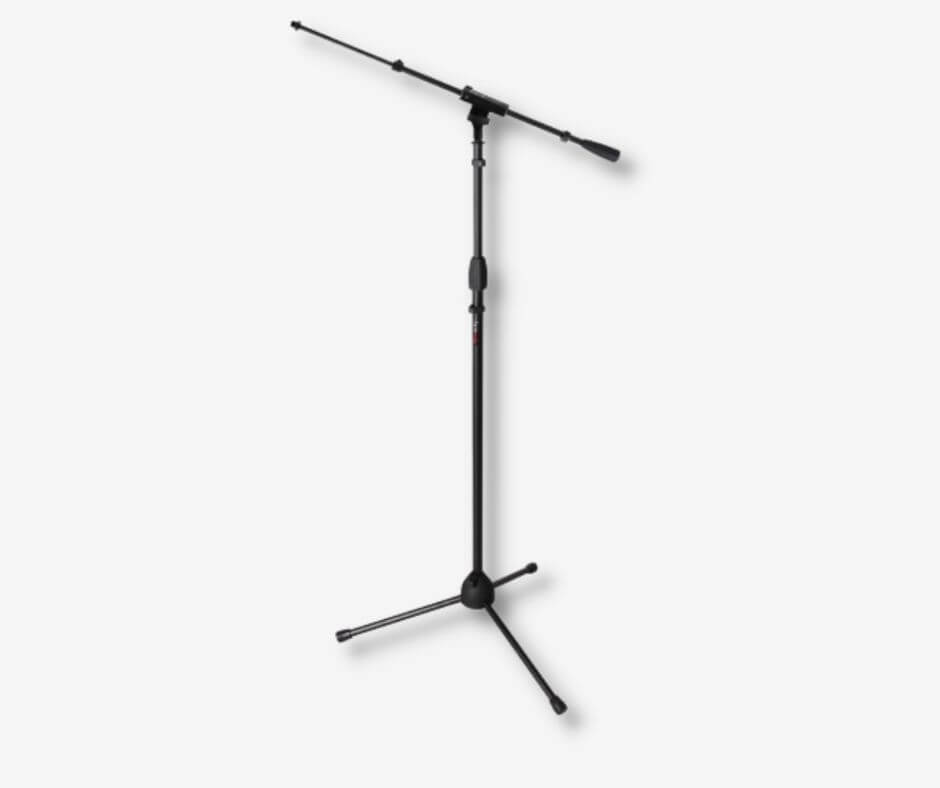
However microphone stands additionally take away the danger of delicate microphones registering static interference that it could in case you have been holding the microphone.
The six kinds of microphone stand:
- Tripod stands are the most typical microphone stand. They’re designed for common use, they usually’re generally used to seize guitar cupboards. You may determine them through their three tripod-style ft.
- Tripod growth stands have an extended attain than tripod stands however preserve the three tripod model ft.
- Spherical base stands have a spherical base quite than ft. This design takes up much less ground house which makes them nice for capturing vocals as they’re tougher to journey over.
- Low profile stands are smaller in dimension. In consequence, we are able to use them to seize kick drums and even guitar cupboards.
- Desktop stands appear like low-profile stands on account of their smaller dimension however can have tripod ft or a spherical base. They’re nice for podcasting and bed room recording!
- Overhead stands are the tallest – and most costly – microphone stands. We’d use them when we have to attain huge heights and awkward angles like drum overheads
3. Shock mounts
As condenser microphones are such delicate mics, we’d like a microphone shock mount to keep away from ruining recordings. Ought to something contact a delicate microphone, it sends low-frequency rumbles and artifacts by the mic and into the recording.
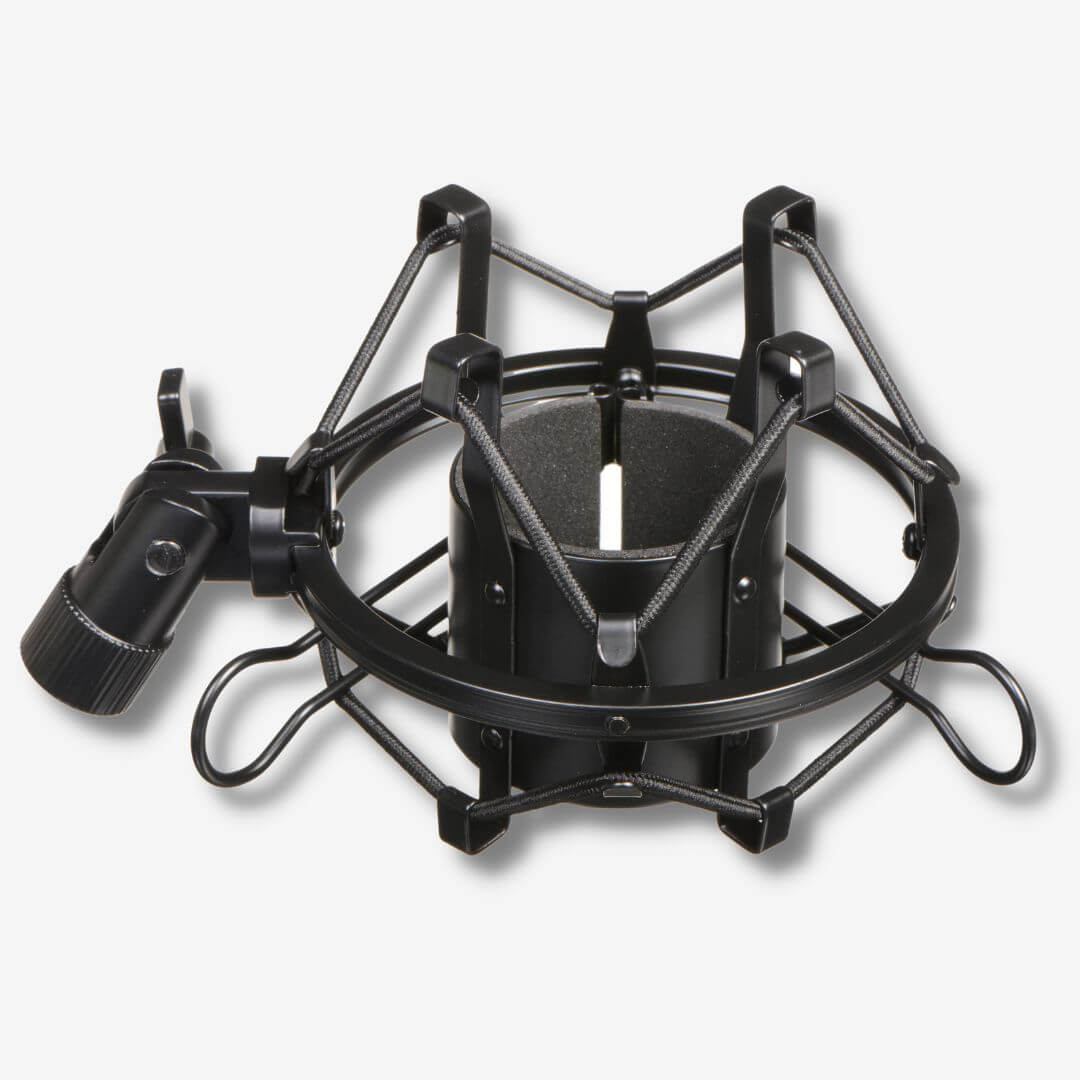
However a shock mount suspends the microphone in order that they forestall these artifacts from interfering along with your recording.
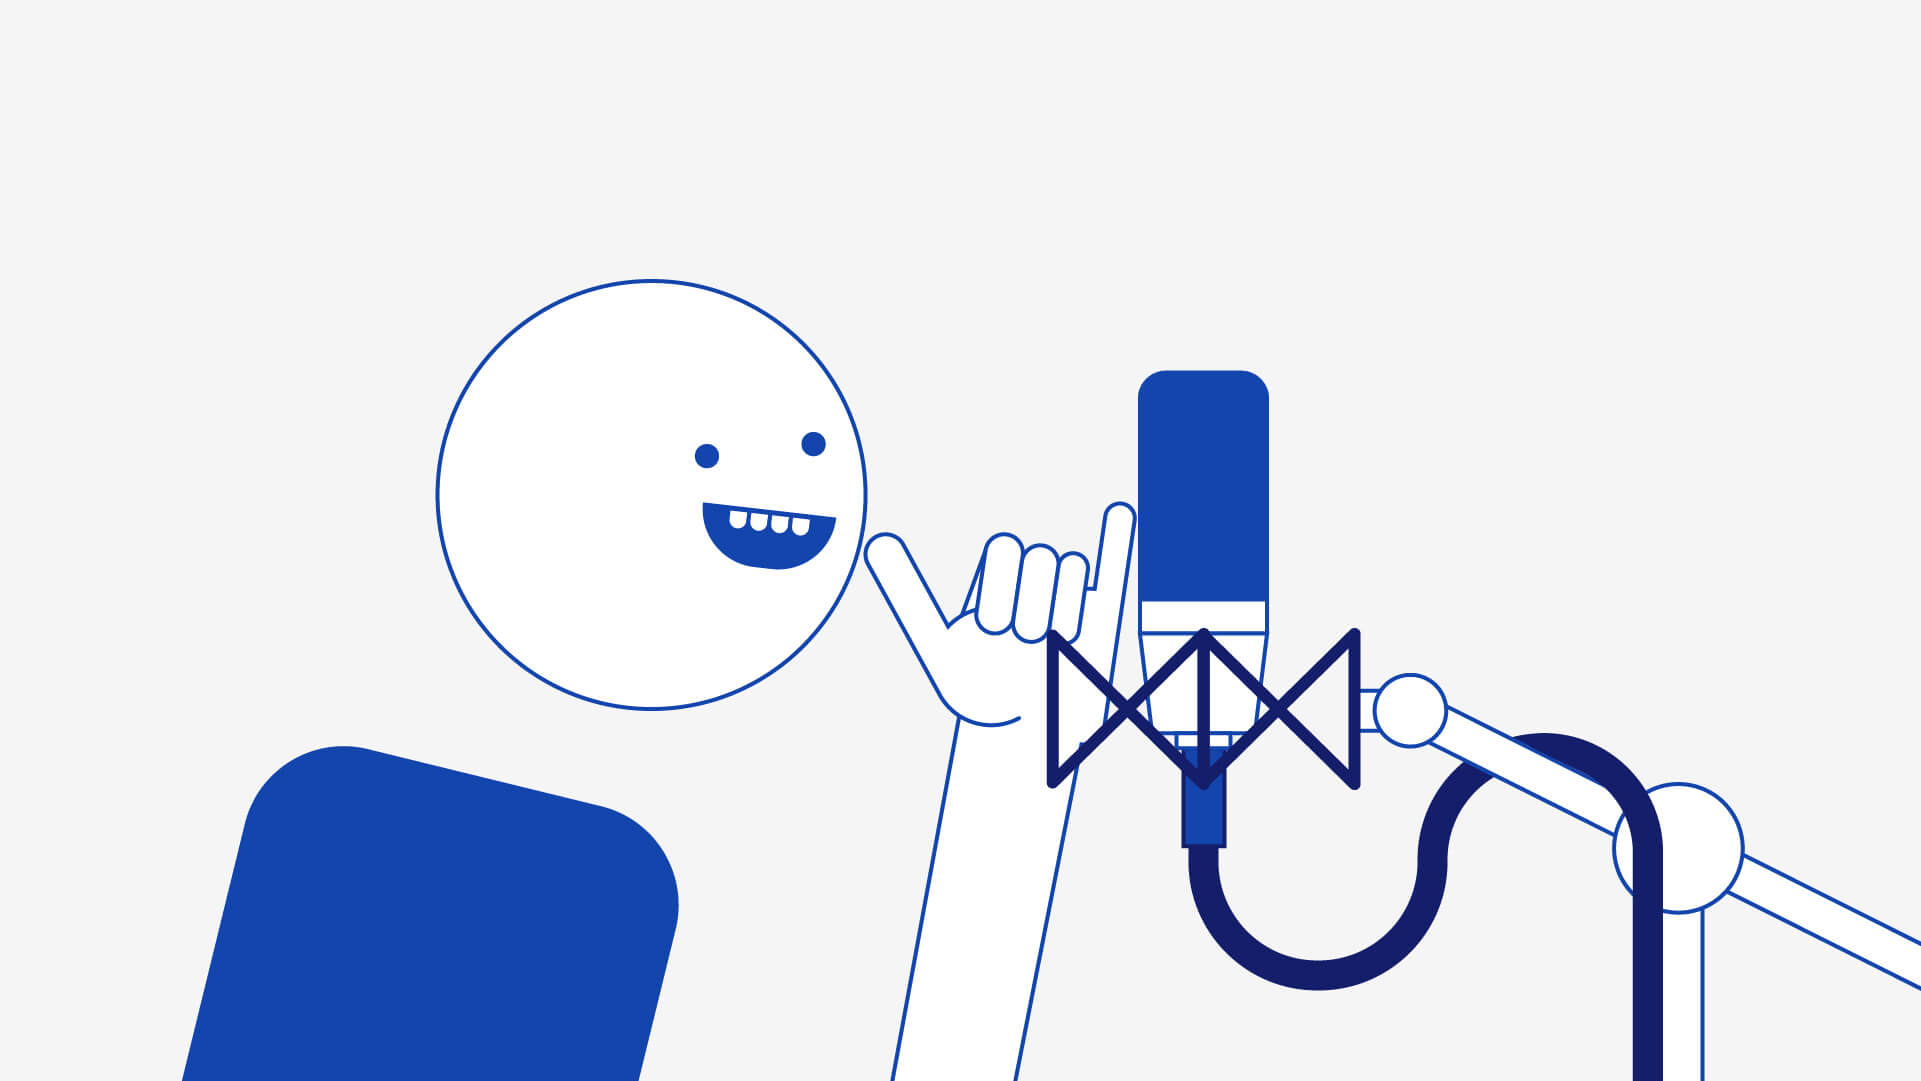
4. XLR cables
XLR microphone cables will let you join your mic to an audio interface, a microphone preamp, or a mixing desk.
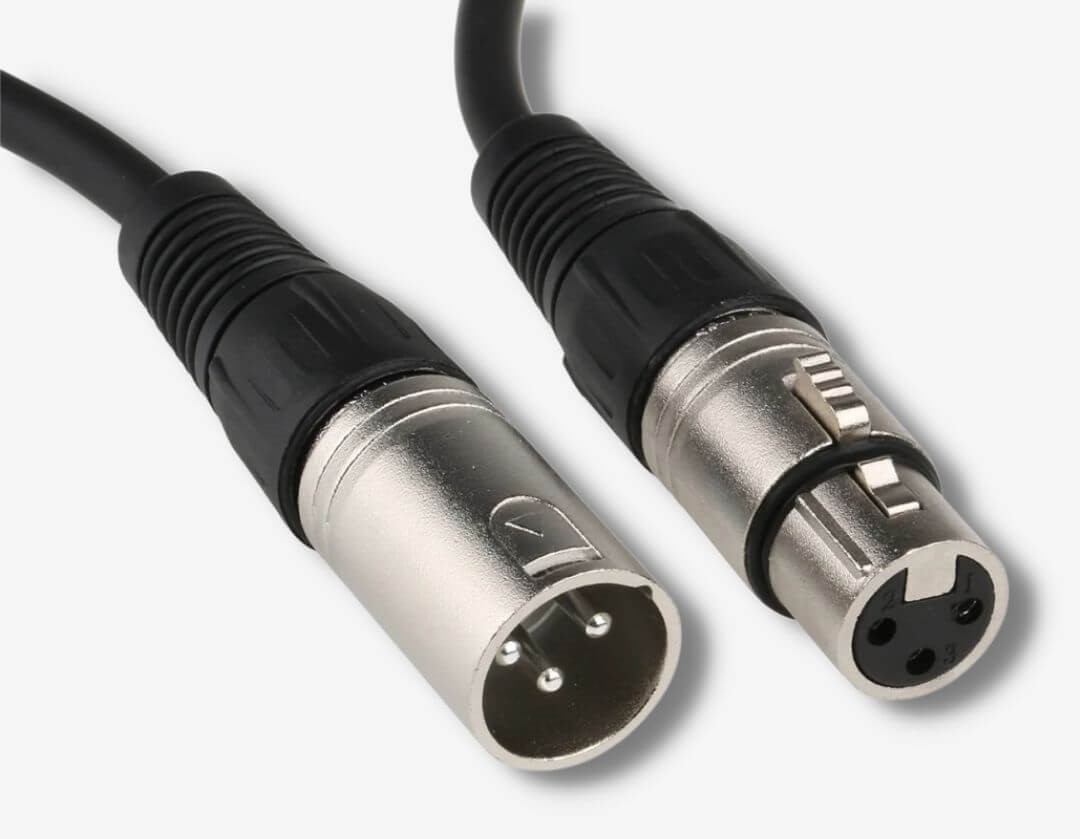
They’ve 3 pins contained in the male connector and three holes within the feminine connector.
Two of these pins are hooked up to sign wires that carry equivalent copies of the mirophone sign whereas the third is a grounding pin.

Having two sign wires makes XLR cables balanced cables whihc means they get rid of undesirable noise that builds up within the sign because it travels by the sign.
5. Microphone preamps or audio interfaces
A mic preamp boosts the power of microphone output indicators. As a result of microphones are weak electrical indicators, we have to enhance that recorded sign to make it audible.
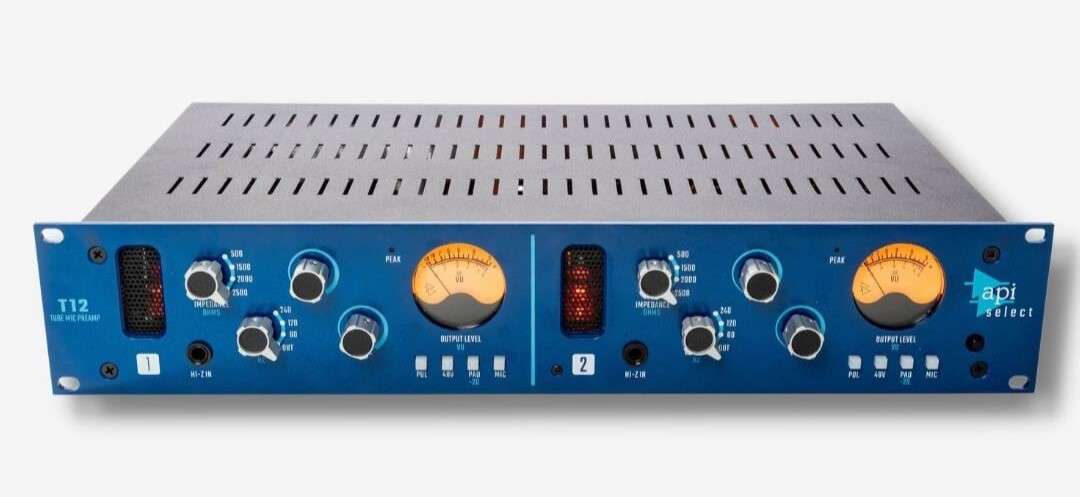
Nevertheless, you received’t have to spend money on a preamp for recording when you’ve got an audio interface.
An audio interface is a digital recording gadget utilized in residence {and professional} recording studios. Interfaces convert electrical microphone indicators into digital indicators that computer systems can learn, and they also permit us to report music on computer systems and digital audio workstations.
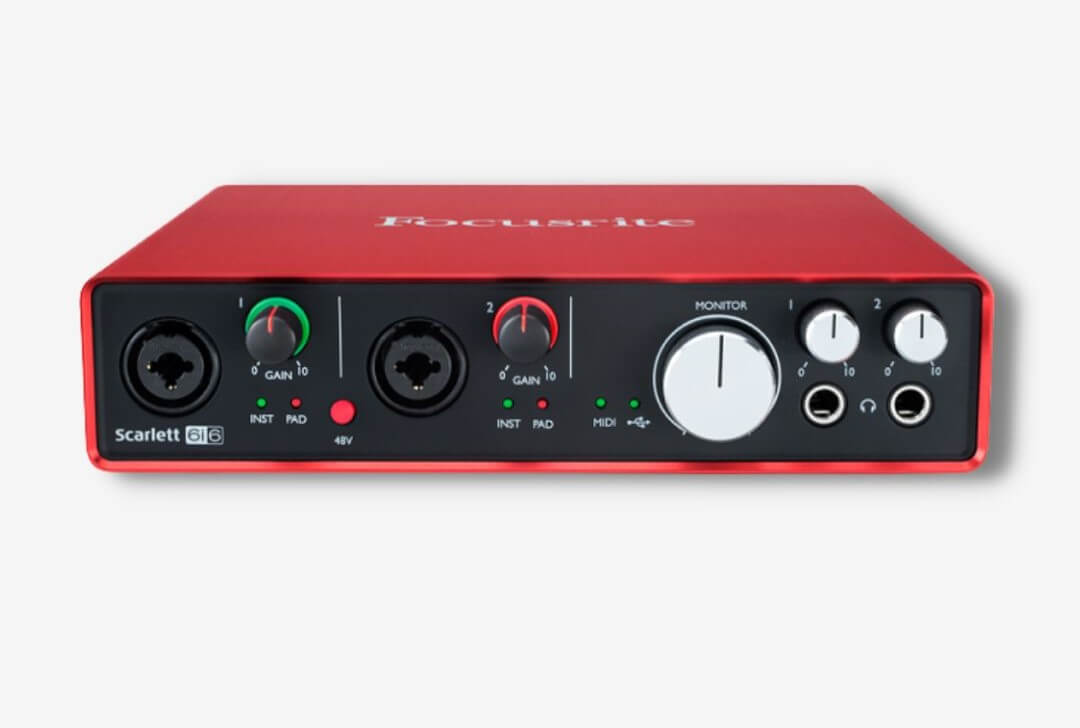
Audio interfaces make the most of a minimum of one preamp, so you possibly can seize skilled recordings with ease.
6. DAWs – software program for recording vocals
A DAW – a Digital Audio Workstation – is software program that permits us to report and make music on computer systems.

You may report and edit your vocal recordings inside a DAW, in order that they’re the software program device you’ll have to report your vocals in your laptop.
7. Closed-back monitoring headphones
The design of closed-back headphones prevents sound from leaking into your outdoors atmosphere and into your microphone.
Subsequently, they’re excellent for monitoring whereas recording as closed-back monitoring headphones don’t jeopardize your recording.
Microphone positioning and recording strategies
The way you place your microphone is equally as essential because the microphone you select. It’s one of many largest variables that determines the tone of your recording, however the way you place your mic depends upon the kind of microphone you’re utilizing.
Microphone pickup patterns
Microphone pickup patterns confer with the instructions {that a} microphone can register sound. There’s a handful of various mic pickup patterns, however the most effective pickup sample for capturing vocals is the cardioid sample.
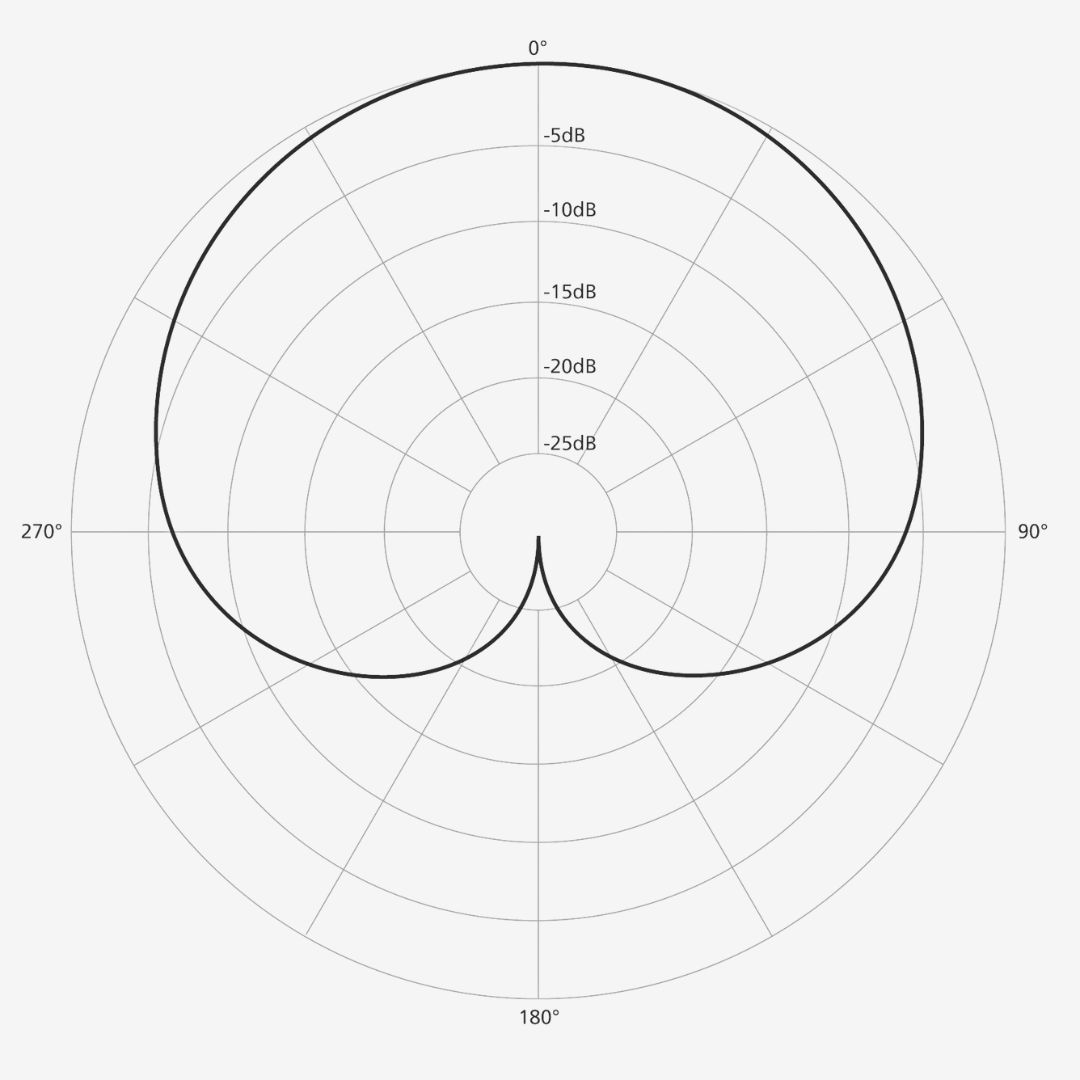
Cardioid microphones are tremendous delicate to sound straight in entrance of the microphone. Although a cardioid mic will register incoming sound from the edges, any sign captured right here might be quieter than the sign from the entrance.
Moreover, any sound from the rear of the mic head is rejected.
Although poor acoustic areas are all the time undesirable, cardioid microphones may also help decrease the danger of registering mirrored sound and suggestions too.
Adjusting the axis of the microphone
Earlier than you report and between takes you possibly can rotate your microphone a couple of levels left or proper to seize completely different tones or seize some room ambiance.
Actually, a microphone off-axis can considerably cut back plosives (Ps and Bs) and sibilance (S & Ts). And you’ll add extra movement to your recording by bodily shifting whereas recording too.
For instance, standing farther from the mic within the verse however nearer to it within the refrain provides extra vitality to the refrain. However do not forget that the mic might be extra delicate to fluctuations the nearer you stand to your microphone.
The place to put your microphone in a room
It’s greatest to put your microphone simply off the middle of your room in case you’re not recording in an remoted sales space/pillow fort.

You’ll need to keep away from inserting your microphone in the midst of your room. It’s right here that standing waves (a product of mirrored sound) build-up, and they also’ll intervene along with your recording.
Moreover, place your microphone as far-off from partitions and reflective surfaces as attainable, and keep away from inserting it within the nook of the room.
How shut must you be to your microphone?
Hold a minimum of 5 to 10 inches from the microphone in case you’re utilizing a cardioid condenser mic just like the Rode NT1-A. However when you’ve got a dynamic cardioid microphone you may get a bit nearer.
A very good rule of thumb to measure the minimal distance to be out of your mic is to unfold yor thumb & pinky finger out within the “dangle unfastened” hand signal. Extra particularly, have your thumb in your lips and your pinky in your mic and you need to gte about 5-6 inches of distance.
Furthermore, your microphone will register room ambiance the additional you stand out of your microphone. However the acoustics of your room will dictate how far you possibly can stand away out of your microphone. If it’s a poor house you then’ll get extra undesirable mirrored sound than fascinating room ambiance.
However the nearer you might be will make the vocals themselves sound hotter. With that stated, the nearer you might be to the microphone, the extra obvious fluctuations might be in case you transfer round quite a bit whereas recording with a cardioid microphone.
It doesn’t matter what microphone you’re utilizing, it’s a good suggestion to spend 20 or so minutes experimenting with completely different mic positions to see what sounds greatest in your present undertaking. For essentially the most pure recording, you’ll have to preserve your mouth straight consistent with the mic’s diaphragm.
The proximity impact
The proximity impact happens when a sound supply is simply too near the microphone. Cardioid microphones are literally fairly weak to the proximity impact as a result of they’re hypersensitive to any sign in entrance of the mic.
Moreover, the proximity impact amplifies low frequencies within the incoming sign, making bass tones extra pronounced when the supply is nearer to the microphone.
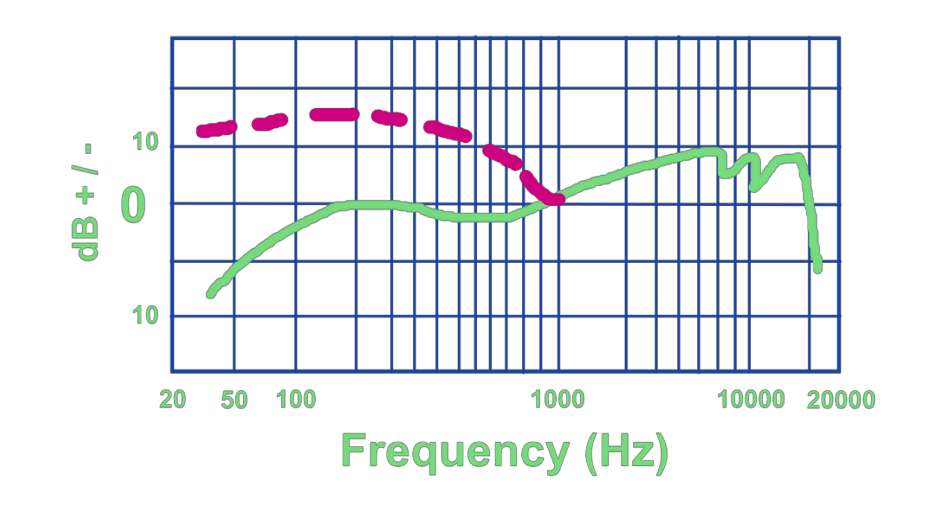
However these with skinny voices can use the proximity impact to their benefit. Somebody with a thinner voice could make their vocals sound fuller by singing nearer to the microphone
Then again, anybody with a deeper voice might want to stand additional away from the microphone. The proximity impact makes deeper voices sound overwhelmingly thick and should distort the sign.
Experimenting with the peak of your microphone
Be cautious of the peak of your microphone. Greater frequencies are directional, that means they journey one path at a time in comparison with low frequencies that are omnidirectional.
So a microphone positioned beneath your lip will sound brighter than one above your lip as a result of excessive frequencies emit from our mouths in a downward cone. However a decrease microphone might be nearer to your chest and improve the bass response.
And having your microphone above your lip will cut back the highs and lows and provide you with a extra pronounced mid-range. And elevating the mic once more by a couple of inches to eye degree (pointing downwards) will enhance the decrease mids, attenuating the bass, and decreasing highs.
You would experiment with all of those positions and mix them and obtain a very pronounced sound too. Experiment with the peak of your microphone and see what sounds greatest.
Although having the mic at lip degree is the most typical top, is it proper in your music?
What number of vocal takes must you do?
Report a minimum of 3-6 vocal takes. You’re extra prone to seize all your singing skills the extra vocal takes you seize.
Moreover, the extra takes you report permits you to experiment with microphone placements as we mentioned above. Actually, {many professional} tracks comprise choices of a number of takes.
Generally, you may get what could be the most effective take however it options a few errors. Effectively, with a number of takes you possibly can “punch in” a bit from one other take, and the issue is solved!
Apart from fixing errors, you possibly can report a number of takes and layer them on high of each other for a thicker sound. Or you possibly can ship one take to the left and one to the appropriate for a wider sound, or do each.
Every vocal take being completely different provides to the tone of the vocals general too!
Setting ranges for recording
The ultimate step earlier than you can begin recording is gan staging. Setting the appropriate enter ranges in your DAW is essential as to keep away from clipping/distorting your recording, and finally get a smoother recording.
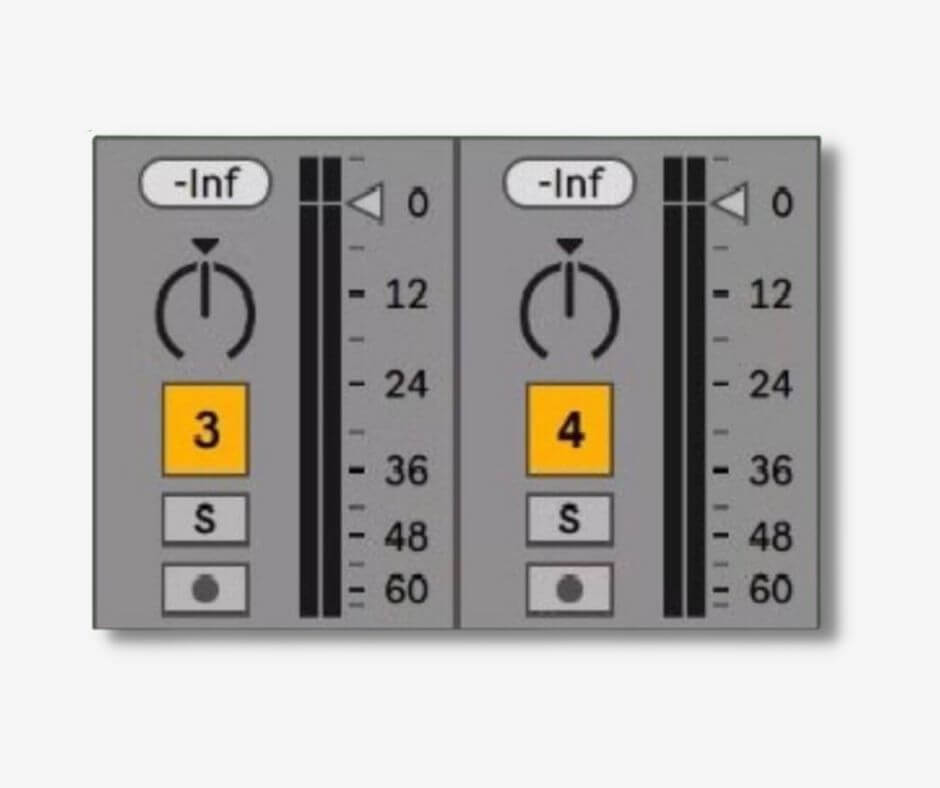
The rules under are nice beginning factors to keep away from swallowing an excessive amount of headroom.
- Averaging round -18dBFS
- Peaking round -10dBFS
- By no means peaking larger than -6dBFS
Be sure you sing as loud as you possibly can as you set your ranges!
Find out how to combine vocals professionally
With all your takes down it’s time to make your vocals match with the remainder of your music. However keep in mind that the way you combine your vocals depends upon:
- The tone of your vocals
- How properly you’ve gotten delivered them
- The standard of the recording
It’s good apply to hearken to the vocals with each different instrument enjoying so you possibly can gauge what it is advisable do within the mixing course of.
The place ought to vocals sit in a mixture?
Vocals should be entrance and middle – actually. By recording in stereo, you’ve gotten a left, proper, and middle channel that you could pan the weather of your observe to. Making the most of the house between every of these channels creates a stereo picture.
The primary parts of your vocals needs to be the loudest parts sitting within the middle of your stereo picture. They should be clear in your listener to listen to and having them entrance and middle on this approach permits them to be so.
Suggestions for mixing vocals
There are a handful of results that you just’ll use when mixing vocals. However the most effective factor to recollect is that much less is extra.
1. Excessive move filtering
The very first thing to have a look at is filtering pointless frequencies in your vocal recording. Listening to your recording is the most effective to determine how a lot filtering is important.
Firstly, reduce out any frequencies under 180 Hz with a excessive move filter. Then increase the edge till you begin to lose the physique of the vocals. The place that is taking place is the place your filter threshold ought to sit.
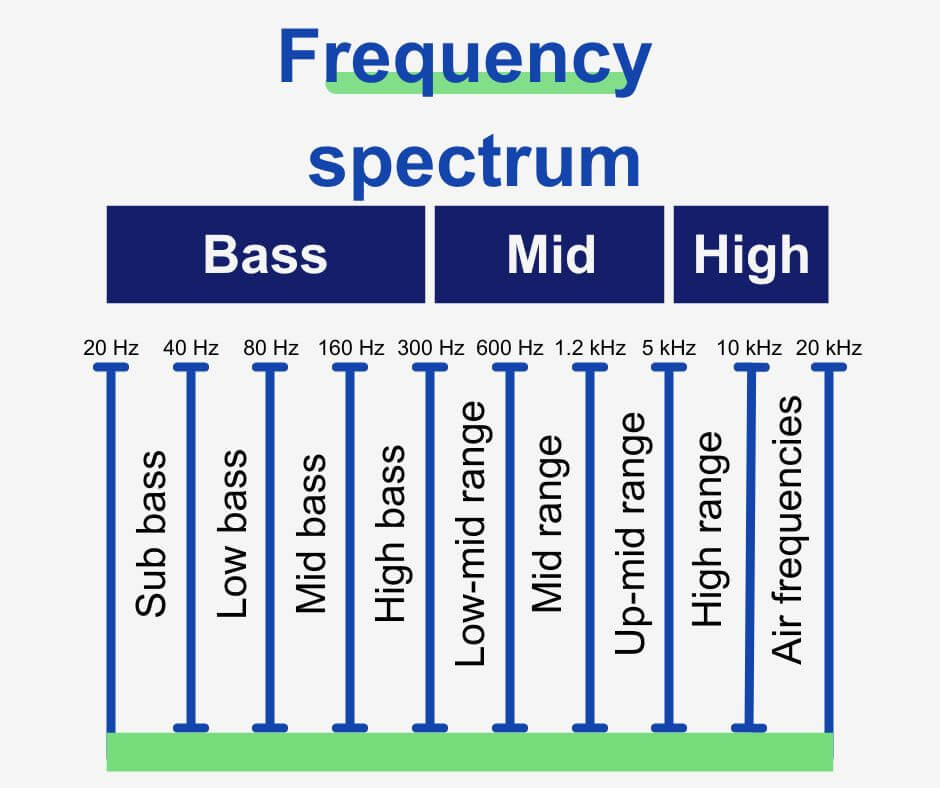
In any case, it’s greatest to take a bit an excessive amount of away and dial the filter again. You may regulate the filter at any time anyway!
This technique of eradicating low frequencies cleans up the recording by eliminating low-end muddiness.
2. De-essing and compressing
Subsequent, it’s time to have a look at de-essing.
De-essing removes harsh sibilance out of your recording. We produce sibilance after we say phrases with the letters S and T in them, they usually’re fairly harsh to hearken to in a microphone recording.
There are a variety of free de-esser plugins on the market too resembling T-De-Esser by Techivation and Spitfish by digitalfishphones.
And now you possibly can start to even out the degrees with compression. However quite than utilizing one compressor with huge settings, I like to recommend utilizing two compressors with small settings on every (serial compression).
Insert the primary compressor and use it to even issues out. Purpose to make the height ranges as whilst attainable with out eradicating too many dynamics. You may see these recommendations as a tenet:
- A ratio of two:1 or 4:1
- Assault time of round 50ms
- Launch time of 40ms
- Experiment with the edge till you might be getting a minimum of 2-3dB of achieve discount.
As for the second compressor, use this one to govern the tone of your recording and make your vocals sound extra strong.
Right here, use extra aggressive settings:
- A ratio of a minimum of 4:1
- Assault time of 15ms or decrease
- Launch time of 10ms or decrease
- Experiment with the edge
3. EQ
Now you possibly can start EQ’ing your vocals.
Whereas referencing how your vocals sound in amongst the remainder of your observe you possibly can determine what frequency bands want adjusting.
As a rule of thumb, boosting the frequencies in and across the 5kHz vary offers your recording extra presence.
However attenuating some excessive mid frequencies under the 5kHz threshold may clear up any harsh frequencies if there are any.
A simple approach of discovering harsh frequencies is to use temporary achieve boosts to frequency bands. By doing so you possibly can decide what stands proud and what sounds disagreeable.
Be sure that to make use of the make-up achieve or equal management to convey the extent of your recording again up or all the way down to the place it was once you’re finished EQ’ing.
4. Reverb and delay
The ultimate stage of blending is making use of reverb and delay so as to add some extra depth to your recordings.
This stage glues all the things collectively, so don’t be afraid to experiment. Attempt utilizing decrease delay occasions after which longer ones, and you’ll experiment with the stereo width of your observe right here too.
For instance, you possibly can break up the channel into two channels and pan one left and one proper. Then insert a delay plugin onto one and apply a delay time of 10 – 15ms and see how a lot wider your recording appears!
How you employ delay and reverb may be very dependent in your observe. However whereas making use of results like reverb to vocals do not forget that much less is extra as a result of a bit goes a good distance!
Remaining ideas: extra suggestions for recording vocals
And now you realize all the things it is advisable get began recoridng recording skilled vocals at residence!
After you have the neccesary gear, you’ve warmed your vocals up and are recoding in the appropriate place with the strategies taht be just right for you, you’re set!
However there’s all the time much more to be taught. And that’s why we thought l;eaving you with these bonus suggestions could enable you to additional in your journey!
- Management your respiratory once you’re recording
Naturally, you’lll have to breath whereas recording – however breath sounds can intervene with the standard of your recording!
It is possible for you to to chop some within the mixing stage however decreasing extreme respiratory will make modifying your recordng that little bit simpler. To take action, merely flip your head to both aspect away from the microphone for every breath.
With that stated, some respiratory can add worth to your vocal recording. A restricted quantity of breath sounds give the recording a pure really feel, so studying the place breath sounds sit greatest – normally in the beginning of a phrase – will degree up your recording sklls.
- Make the most of vocal comping for a clean workflow
It’s tough to get all the things proper in a single take as we mentioned earlier. And that’s why so many artists make the most of composite takes – recording an entire observe one part at a time, referred to as vocal comping.
Recording a number of takes of every part offers you so many recoridngs to work with that you just’re certain to create the most effective recording and seize excellent the vocal recording! Merely select the most effective takes of every part and create a full observe with them.
- Add audio results on the proper time
Although there’s no ‘rule’, it’s usually higher to report dry vocals (with no processing) in case you’re not an skilled vocalist.
Except for the results we have now already talked about there are a great deal of artistic results on the market. And it may be tempting to insert as many attainable earlier than recording, however’s not all the time an excellent thought.
When you report it you can’t take away any processing, so it’s a good suggestion to depart the audio results till you’re pleased with all your vocal takes. As a resut, it’s simpler to listen to any errors in your recording which will want modifying or chopping.
Okay, that’s sufficient studying – how is your recording approaching?
Don’t forgte to distribute your music globally with RouteNote. Distribute your music all over the world FOR FREE and preserve 85% of all income!