Recording
DAW workflow and organisation for sooner mixing
Phrases by Andy Lloyd-Russell
The way to work smarter not more durable inside your DAW.
Recording and blend classes in a DAW (Digital Audio Workstation) will be daunting, with so many audio tracks, MIDI tracks, auxiliary tracks, sub teams, and the checklist goes on. With all of this in thoughts, it’s simple for our mind to finish up like a bowl of spaghetti; all twisted up in routing and countless mouse scrolling.
Fortunately, there’s just a few easy issues we are able to do to shortly tidy up our classes to maximise effectivity and improve workflow. I’m going to specializing in the instruments accessible within the newest model of AVID Professional Instruments, however the ideas are the identical and will be carried out in what’s accessible in different DAWs.
Abstract:
- Clear monitor labelling, color coding and ordering is crucial to with the ability to shortly navigate and make adjustments to your combine.
- Grouping tracks together with utilizing auxiliary and VCAs can assist you have an effect on a number of tracks directly whereas sustaining management over their particular person settings.
- Holding your session clear and tidy will allow you to combine sooner but additionally your collaborators because it permits them to see precisely what’s happening inside your session.
Learn all the newest options, columns and extra right here.
Structure, Labelling & Color Coding
One of many best methods to maintain a session so as is by establishing a constant session structure, clear monitor labelling and for many who get pleasure from a little bit additional pizazz, color coding.
In a typical band recording or combine session we’d count on to see an assortment of audio tracks normally consisting of drums, bass, guitars, piano/keys, percussion and vocals. Even on this comparatively easy instance, issues can begin to get furry when making an attempt to maintain on high these totally different parts in a session window. Having a formulated structure of how tracks are displayed is so useful, I might go as far as to say it’s calming; and makes for lightening quick navigation of a session.
For arguments sake and beginning on the left of display we’d usually begin with drums and as we transfer to the appropriate we’d have bass, then as we scroll additional alongside we get to different parts resembling guitars, piano/keys, percussion and vocals. As soon as an order has been established that works in your workflow, I’d advocate sticking with it. This won’t solely save your mind energy for extra necessary duties however it can develop into second nature when navigating round even the densest of classes.
Labelling is subsequent and an necessary one. The important thing right here is to maintain it easy, simple to learn at a look and if utilizing abbreviations, make them clear and apparent. For drums for instance you may need a few mics on the kick drum. As an alternative of labelling them one thing obscure like Kick 1 and Kick 2, one thing like Kick In (for the mic positioned contained in the drum) and Kick Out (for the mic positioned outdoors the drum) can be an excellent place to begin, and so forth down the road. If extra particular data is required, this may be positioned in a feedback part or related.
Lastly, color coding. While it isn’t essentially for everybody, color coding will be nice for shortly discerning parts at a look. Most DAWs will give choices to make color coding obviously apparent or extra delicate. Having the audio clips or areas color match that of the monitor color is an effective way to maintain a combination session very easy to navigate, take a look at and is arguably much less visually fatiguing. Very similar to the aforementioned structure and labelling examples, when you’ve selected colors you want in your totally different devices, follow them. This will likely be particularly useful when pulling up classes from years previous, belief me.
Auxiliary Tracks, Teams and VCAs
Relating to increase recording or combine classes organising totally different devices and outputting them to auxiliary tracks (in any other case known as busses or sub teams) is helpful for quite a few causes. With out getting too technical, it permits us to route all the person audio tracks of say a drum package to a single stereo fader. This grants fast management of the entire drumkit by transferring only one fader as a substitute of a number of faders and it additionally permits us so as to add processing resembling EQ and compression over the entire drum package.
Auxiliary tracks are additionally an effective way to setup and place an impact processor, the place we are able to ship a number of tracks to a selected impact on the identical time. This fortunately saves us from putting delays and reverbs on particular person tracks, which in flip saves a bucket a great deal of laptop processing energy. A win for each human and machine. This additionally loops again into the effectiveness of a session structure and conserving all of your auxiliary results tracks collectively is nice follow.
Grouping is one other highly effective characteristic in DAWs for each recording and mixing as they permit us to manage the way in which tracks can work together with one another.
Group parameters can get fairly deep, however usually they’re extremely helpful for muting, soloing and controlling quantity of a number of tracks concurrently. When recording, permitting a bunch of mics for instance to be document enabled on the identical time can’t be understated. It may not sound that astronomical, nevertheless it means urgent document allow actually a whole bunch of instances much less in a session, that’s lots of time saved! One other good trick with teams is permitting the identical processing to occur on a number of tracks which share the identical insert processing. That is nice for issues resembling overheads the place you’ll usually have the identical EQ and compression settings. However as a substitute of getting to repeat issues forwards and backwards, the group does all of it mechanically.
VCAs (Voltage Managed Amplifier) are an excellent addition to the world of DAWs. They’ve been round in analogue mixing consoles for many years, however within the digital recording world are supremely useful. Put merely, VCAs are a quantity management fader which is feed by an current group of tracks; they don’t have an effect on routing or have insert slot or ship slots.
While this will not sound very thrilling, they’re incredible within the massive image of blending. A very helpful characteristic of VCAs in Professional Instruments is the flexibility to regulate the amount of particular person tracks that have already got quantity automation written to them. Usually you may’t modify the fader positions of tracks which have quantity automation written to them, reasonably they merely snap again to the place they have been in earlier than being adjusted.
Nevertheless, if a bunch of tracks are feeding a VCA, we are able to modify the VCA fader, which in flip will modify the fader positions of these grouped tracks, while retaining all of the the automation information relative to the brand new fader positions. That is notably helpful if quantity changes are required in the direction of the tip of a combination or on a combination revision. Conversely, you may write automation for a bunch of tracks by simply writing it to their corresponding VCA fader, fairly helpful stuff.
Folders
One thing that’s been round for a very long time in lots of DAWs however is comparatively new to Professional Instruments is folders. Anybody who’s coping with 80-100+ monitor classes or for these working in put up manufacturing will notably recognize the blessings folders carry to a session.
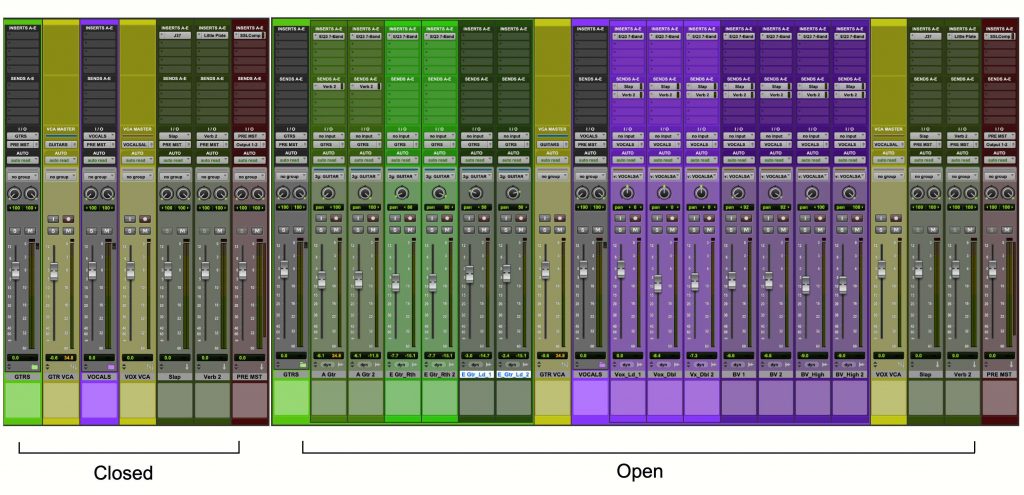
Referring particularly to Professional Instruments folders (you’ll have to examine the precise parameters accessible in different DAWs), there are two varieties of folders accessible, fundamental and routing. Primary folders are nice for cleansing up a busy session and storing tracks away properly with out affecting already established routing. They solely have solo and mute buttons, are purely organisational and fantastic at doing simply that.
Routing folders take issues deeper and basically act like an auxiliary monitor simply with the added performance of being a folder. They’ve insert and ship slots, in addition to enter and output routing assignments. That is nice for conserving a number of tracks all routed collectively by way of a mono or stereo fader, and may merely be opened or shut when required, very tidy certainly. Using using folders in any sized classes is nice for conserving a display from getting too cluttered or from countless scrolling to search out that lead guitar monitor. In case you haven’t acquired into them already, I can’t advocate these extremely sufficient.
Embrace the cleanliness
I for one, am extremely grateful for the instruments we have now accessible right now to assist preserve our recording and blend classes clear and in examine. There’s no arduous or quick guidelines right here, however exploring and discovering an organised workflow that works for you’ll not solely prevent eons of time, however release your thoughts to give attention to the artistic parts of recording mixing. Be gone the times of being instructed to tidy our rooms, embrace the time of nicely organised DAWs classes.
For extra, take a look at our evaluation of Professional Instruments Carbon.